Difference between revisions of "Projects:2016s1-197 Sound Triangulation for Invisible Keyboards"
(→Microcontroller) |
|||
| (16 intermediate revisions by 2 users not shown) | |||
| Line 2: | Line 2: | ||
With the rapid innovation of Human Interface Devices (HID), a common goal is to make more benefits, such as to be more portable, energy-saving and secure [1]. And the keyboard is the one of the most important HID, which is used universally in electronic devices. Therefore, improving the keyboard becomes significant. This project aims to design and implement an “invisible keyboard” by using three microphones to locate the position of keys based on the sound trilateration principle. There are three main parts to our project in terms of proposed method, system design and project management. | With the rapid innovation of Human Interface Devices (HID), a common goal is to make more benefits, such as to be more portable, energy-saving and secure [1]. And the keyboard is the one of the most important HID, which is used universally in electronic devices. Therefore, improving the keyboard becomes significant. This project aims to design and implement an “invisible keyboard” by using three microphones to locate the position of keys based on the sound trilateration principle. There are three main parts to our project in terms of proposed method, system design and project management. | ||
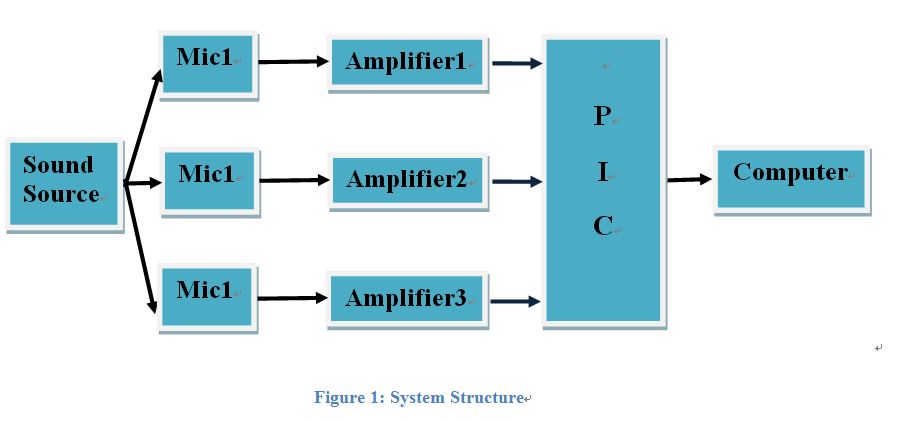
The overall structure of system is shown in figure 1. Firstly, the sound source will be obtained by three identical microphones and then go through amplifiers respectively to amplify sound signals for three channels, which is to ensure the signals can be recognized by the PIC. After using three pin of PIC to receipt three channel signals, the PIC is able to process data, which can be transferred to the computer by a USB connector. Finally, the buttons pressed by users will display on the computer screen by using serial monitor. | The overall structure of system is shown in figure 1. Firstly, the sound source will be obtained by three identical microphones and then go through amplifiers respectively to amplify sound signals for three channels, which is to ensure the signals can be recognized by the PIC. After using three pin of PIC to receipt three channel signals, the PIC is able to process data, which can be transferred to the computer by a USB connector. Finally, the buttons pressed by users will display on the computer screen by using serial monitor. | ||
| + | |||
| + | [[File:introd.jpg]] | ||
| + | |||
===Objectives=== | ===Objectives=== | ||
| Line 16: | Line 19: | ||
Trilateration is a method to be used to locate the absolute or relative positions of points by measuring the distances and using the geometry of circles, spheres or triangles [2]. Compared with triangulation, it does not measure angles, but distances. More specifically, trilateration applies the known positions of two or more reference points to gauge the distance between a subject and each reference point [2]. These reference points are anchored and known locations. | Trilateration is a method to be used to locate the absolute or relative positions of points by measuring the distances and using the geometry of circles, spheres or triangles [2]. Compared with triangulation, it does not measure angles, but distances. More specifically, trilateration applies the known positions of two or more reference points to gauge the distance between a subject and each reference point [2]. These reference points are anchored and known locations. | ||
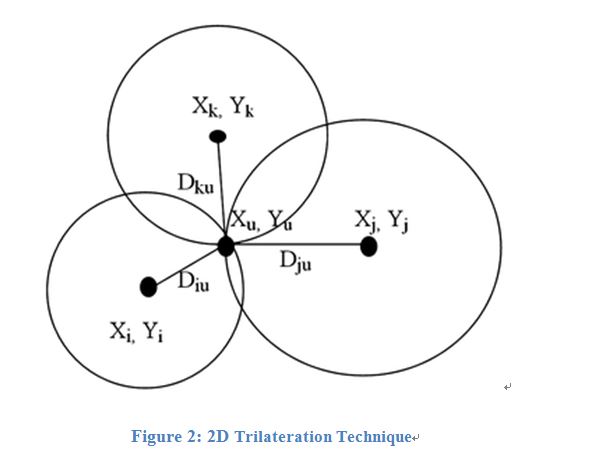
As to a two-dimensional (2D) plane shown in figure 2, at least three reference points are required to determine the position of a subject accurately and uniquely, which are (Xi, Yi), (Xj, Yj) and (Xk, Yk). The point of a subject is (Xu, Yu). Therefore, three distances between the subject and each reference point can be measured as Diu, Dju and Dku. | As to a two-dimensional (2D) plane shown in figure 2, at least three reference points are required to determine the position of a subject accurately and uniquely, which are (Xi, Yi), (Xj, Yj) and (Xk, Yk). The point of a subject is (Xu, Yu). Therefore, three distances between the subject and each reference point can be measured as Diu, Dju and Dku. | ||
| + | |||
| + | [[File:theor.jpg]] | ||
===Time Difference of Arrival (TDOA)=== | ===Time Difference of Arrival (TDOA)=== | ||
| Line 25: | Line 30: | ||
Δt2 = Tku – Tiu = Dku / V – Diu / V (2) | Δt2 = Tku – Tiu = Dku / V – Diu / V (2) | ||
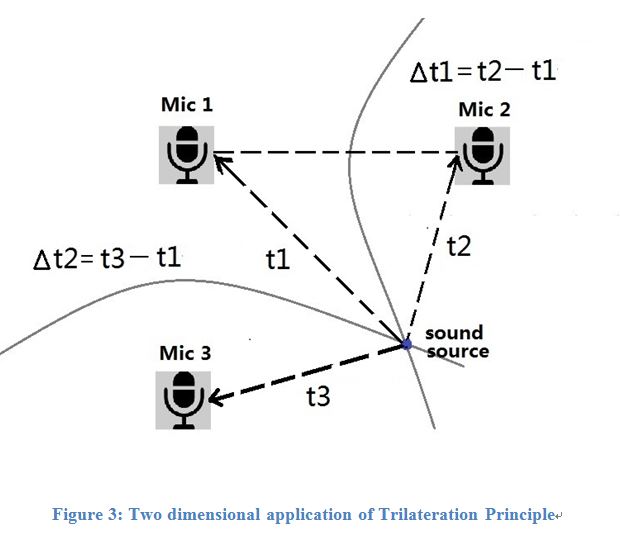
| − | For our project case as the figure 3 shown, the minimum number of microphones is three according to the sound trilateration principle in two-dimensional geometry, and the reference points are the location of microphones; the subject point is the sound source. The t1 is the propagation time spent from sound source to Microphone 1; t2 is the propagation time spent from sound source to Microphone 2. Therefore, a TDOA can be acquired as Δt1 (Δt1 = t2- t1). Likewise, another TDOA can be calculated by subtracting times from sound source to Microphone 1 and Microphone 3 (Δt2 = t3- t1). It is not difficult to find that there are many points with the same TDOA (Δt1) on a curve as shown in figure 3, which is same as a hyperbola [3]. Another curve can be drawn by another TDOA (Δt2), which is also a hyperbola. The intersection of the two different hyperbolas provides a unique position of subject point (sound source) [3]. Consequently, two different TDOA can position an exclusive location in 2D case. | + | For our project case as the figure 3 shown, the minimum number of microphones is three according to the sound trilateration principle in two-dimensional geometry, and the reference points are the location of microphones; the subject point is the sound source. The t1 is the propagation time spent from sound source to Microphone 1; t2 is the propagation time spent from sound source to Microphone 2. Therefore, a TDOA can be acquired as Δt1 (Δt1 = t2- t1). Likewise, another TDOA can be calculated by subtracting times from sound source to Microphone 1 and Microphone 3 (Δt2 = t3- t1). It is not difficult to find that there are many points with the same TDOA (Δt1) on a curve as shown in figure 3, which is same as a hyperbola [3]. Another curve can be drawn by another TDOA (Δt2), which is also a hyperbola. The intersection of the two different hyperbolas provides a unique position of subject point (sound source) [3]. Consequently, two different TDOA can position an exclusive location in 2D case. |
| + | |||
| + | [[File:principle.jpg]] | ||
==Proposed Approaches== | ==Proposed Approaches== | ||
| Line 34: | Line 41: | ||
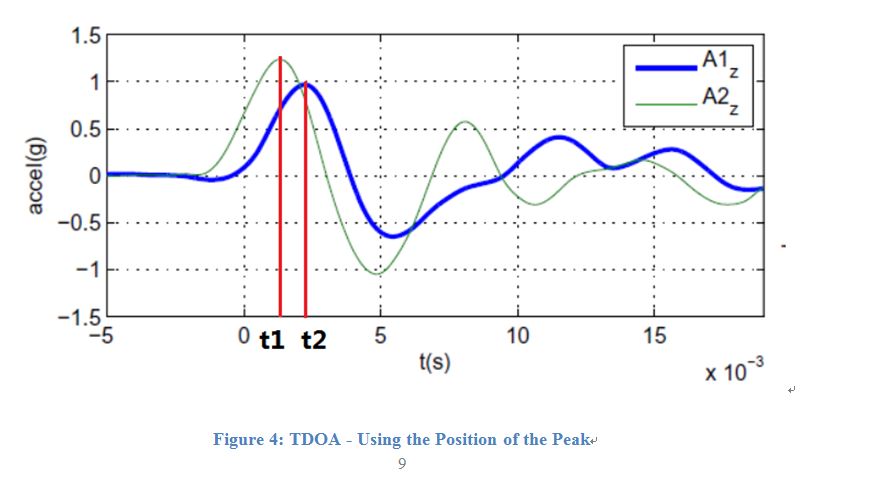
The first method is to capture the entire sound signals for three microphones by using analog input of PIC, and transfer the data to Matlab software, which can plot figure and detect the peak of the initial pressure pulse for each sound signal in time domain. Afterwards find the time corresponding to the peak for each one. As a result, the TDOA can be calculated by subtracting the two times, namely, t2-t1, as shown in figure 4. | The first method is to capture the entire sound signals for three microphones by using analog input of PIC, and transfer the data to Matlab software, which can plot figure and detect the peak of the initial pressure pulse for each sound signal in time domain. Afterwards find the time corresponding to the peak for each one. As a result, the TDOA can be calculated by subtracting the two times, namely, t2-t1, as shown in figure 4. | ||
| − | This method is able to track and inspect the data of sound signals received by PIC. However, using this idea has a couple of weaknesses, which cannot achieve a desired deliverable. Firstly, the speed of the keystrokes has been limited, because it is time-consuming to capture and transfer the entire sound signals for three channels, and the time of that is much longer than the time of one keystroke. Secondly, this idea is not able to achieve real-time monitoring of keystrokes, because analog reading and transferring data to Matlab are asynchronous communication. In addition, transferring data to Matlab can extend the time of analog reading indirectly. As a result, transferring data to Matlab must be at the end of analog reading of entire sound signals for three channels. | + | This method is able to track and inspect the data of sound signals received by PIC. However, using this idea has a couple of weaknesses, which cannot achieve a desired deliverable. Firstly, the speed of the keystrokes has been limited, because it is time-consuming to capture and transfer the entire sound signals for three channels, and the time of that is much longer than the time of one keystroke. Secondly, this idea is not able to achieve real-time monitoring of keystrokes, because analog reading and transferring data to Matlab are asynchronous communication. In addition, transferring data to Matlab can extend the time of analog reading indirectly. As a result, transferring data to Matlab must be at the end of analog reading of entire sound signals for three channels. |
| + | |||
| + | |||
| + | [[File:software.jpg]] | ||
===Timer=== | ===Timer=== | ||
| Line 52: | Line 62: | ||
The hardware system consists of four main parts, namely, a keyboard, three microphones, three amplifiers and a PIC as figure 5 shown. Taping key engraved on keyboard will make a sound, which is picked by three fixed and identical microphones. Afterwards, the outputs of three microphones go though amplifiers respectively to amplify sound signals. Finally, PIC will receive signals and process data, and the results are shown on the screen by using serial monitor. | The hardware system consists of four main parts, namely, a keyboard, three microphones, three amplifiers and a PIC as figure 5 shown. Taping key engraved on keyboard will make a sound, which is picked by three fixed and identical microphones. Afterwards, the outputs of three microphones go though amplifiers respectively to amplify sound signals. Finally, PIC will receive signals and process data, and the results are shown on the screen by using serial monitor. | ||
| + | |||
| + | [[File:pic.jpg]] | ||
===Keyboard=== | ===Keyboard=== | ||
A flat plate is used as a keyboard engraved 12 “buttons” as shown in figure 6, which can be made by plastic or wood and both of them can be tapped to make a loud sound. The size of button is 1cm x 1cm, because if the button is too large, it will not save space and will trigger a big range of TDOA for each key, which may lead to trouble to distinguish the adjacent button. If the button is too small, it will be hard for users to tap button even though it reduces the difficulty for locating. Considering the points mentioned above, the 1cm x 1cm key can be an appropriate choice. The spacing between buttons is 2cm, which decides that the time of sampling to each sound signal must be less than 57.74 microseconds (us) according to the calculation in section 4.2.1. That will be a challenge for PIC. The three microphones will be placed and mounted at the edges as shown below, whose specification and design is described in the next section. | A flat plate is used as a keyboard engraved 12 “buttons” as shown in figure 6, which can be made by plastic or wood and both of them can be tapped to make a loud sound. The size of button is 1cm x 1cm, because if the button is too large, it will not save space and will trigger a big range of TDOA for each key, which may lead to trouble to distinguish the adjacent button. If the button is too small, it will be hard for users to tap button even though it reduces the difficulty for locating. Considering the points mentioned above, the 1cm x 1cm key can be an appropriate choice. The spacing between buttons is 2cm, which decides that the time of sampling to each sound signal must be less than 57.74 microseconds (us) according to the calculation in section 4.2.1. That will be a challenge for PIC. The three microphones will be placed and mounted at the edges as shown below, whose specification and design is described in the next section. | ||
| + | [[File:keyboard.jpg]] | ||
===Microphones=== | ===Microphones=== | ||
| − | The Sparkfun Electret Microphone Breakout bob-09964 | + | The Sparkfun Electret Microphone Breakout bob-09964 will be used in this project which consists of an omni-directional electret microphone and an amplifier. The operating voltage of it is from 2.7 V to 5.5 V. As mentioned earlier, a quantity of 3 microphones will be used. |
| + | [[File:sparkfun.jpg]] | ||
===Microcontroller=== | ===Microcontroller=== | ||
| Line 65: | Line 79: | ||
The Max32 board takes advantage of the powerful PIC32MX795F512L microcontroller, which features a 32-bit MIPS processor core running at 80 MHz and ADC speed of 1Mbps. This Chipkit can be programmed using Multi-Platform IDE (MPIDE) | The Max32 board takes advantage of the powerful PIC32MX795F512L microcontroller, which features a 32-bit MIPS processor core running at 80 MHz and ADC speed of 1Mbps. This Chipkit can be programmed using Multi-Platform IDE (MPIDE) | ||
| + | |||
| + | [[File:chipkit.jpg]] | ||
==Theoretical Measurements== | ==Theoretical Measurements== | ||
| Line 76: | Line 92: | ||
Following are samples of the experiment results that show the audio signals of the three microphones captured by the oscilloscope showing Δt1 and Δt2, where Δt1 is the time difference between microphones 2 and 1, and Δt2 is the time difference between microphones 3 and 1. | Following are samples of the experiment results that show the audio signals of the three microphones captured by the oscilloscope showing Δt1 and Δt2, where Δt1 is the time difference between microphones 2 and 1, and Δt2 is the time difference between microphones 3 and 1. | ||
| − | + | [[File:key1.jpg]] | |
| + | |||
| + | |||
| + | [[File:key5.jpg]] | ||
| + | |||
| + | |||
| + | [[File:key8.jpg]] | ||
| + | |||
| + | |||
| + | As it can be seen from the results they are very close to our theoretical calculations shown in Table 1. | ||
| + | Then we have recorded the results from the microcontroller at the same time when captured the oscilloscope results. They are shown in Table 2 below. | ||
| + | |||
| + | |||
| + | [[File:Microtable2.jpg]] | ||
| + | |||
| + | |||
| + | Which are also reasonable results and close to the theoretical calculations. The problem here is that we get a different result on microcontroller per each strike try. To solve this problem, we have made a scatter plot showing 10 results per each key, as shown below. Then from that plot we could specify a range of Δt1 and Δt2 per each key. | ||
| + | |||
| + | [[File:scatter.jpg]] | ||
| + | |||
| + | |||
| + | Based on that scatter plot, we constructed the ranges of time differences per each key as shown in Table 3. We used these ranges in programming the microcontroller in order to get correct results, which was the case in most tries. The constructed ranges are separated from each other in the most cases as it can be noticed from the scatter plot. The only two different cases, which have overlapping between two keys, are those between keys 3 and 6, and between 8 and 0. | ||
| + | |||
| + | |||
| + | [[File:ranges.jpg]] | ||
| + | |||
| + | |||
| + | ==Discussion== | ||
| + | After setting up the time difference ranges per each key, we tested the keyboard by tapping each key several times to notice the response. As expected for keys 1, 4 and 5, we got a high percentage of accuracy, 8 correct results out of 8 tries. For key 2 we got 7 correct results out of 8 tries. Key 3 was a special case as its ranges overlap with those of key 6, so we get more than half correct results but sometimes we get a result of key 6 because of the overlapping and vice versa for key 6. Regarding Key 7, more than the half of the results were correct but on the other hand, we got some odd results that showed key 1 or key 8 instead. The overlapping case is repeating again for the case of keys 0 and 8 but less than that with keys 3 and 6, because the overlapping range between keys 0 and 8 is much less. Finally, keys 9, * and #, got more than 60% correct results while the rest didn't show any result which means the recorded time differences were out of ranges of any key. | ||
| + | It has to be mentioned that, we have used a wooden pointer as a material to strike on the keyboard and all our measurements and results were based on that. It has been noticed also that the strength of the strike will affect the results and may give wrong results for example if the strike was too strong or too low. This should be as a future work to make the keyboard work on all cases including using fingers for example instead of the pointer. In addition, future work is required to solve the problem of the strike strength. | ||
| + | |||
| + | ==Conclusion== | ||
| + | This project aims to design and implement a virtual keyboard based on the principle of trilateration. Three microphones will be positioned around a working space for detecting particular sound patterns. Based on the sound trilateration principle, the location of a strike can be precisely determined from different delay times of the sound it generates. This position can be translated into an associated key on a conventional keyboard. For each key in the keyboard there are two time differences which help to locate the sound source. After doing several experiments, we could specify ranges of time differences per each key which helped to predict the value of the key. Limitation about that is when the time difference ranges overlapping between some keys like 3 and 6, and between 0 and 8. | ||
| + | |||
| + | |||
| + | ==Future Work== | ||
| + | Future work is to extend the number of buttons on the keyboard and to use more microphones for picking up the strike which will result to more precise positioning. Also, to make the keyboard respond and work on finger strike. | ||
== Topic == | == Topic == | ||
Latest revision as of 16:15, 26 October 2016
Contents
Project Instruction
With the rapid innovation of Human Interface Devices (HID), a common goal is to make more benefits, such as to be more portable, energy-saving and secure [1]. And the keyboard is the one of the most important HID, which is used universally in electronic devices. Therefore, improving the keyboard becomes significant. This project aims to design and implement an “invisible keyboard” by using three microphones to locate the position of keys based on the sound trilateration principle. There are three main parts to our project in terms of proposed method, system design and project management. The overall structure of system is shown in figure 1. Firstly, the sound source will be obtained by three identical microphones and then go through amplifiers respectively to amplify sound signals for three channels, which is to ensure the signals can be recognized by the PIC. After using three pin of PIC to receipt three channel signals, the PIC is able to process data, which can be transferred to the computer by a USB connector. Finally, the buttons pressed by users will display on the computer screen by using serial monitor.
Objectives
This project aims to achieve an “invisible keyboard” by using three sensors (electret microphones) to locate the position of keys (sound sources) based on the speed of sound through the air according to sound trilateration principle.
Motivation and Significance
The keyboard designed by our project group is a flat plate engraved with keys surrounded by three microphones. It does not require many materials so it is lighter and more energy-saving than a normal keyboard. In addition, a serious security risk is possible by finding the sequence of pressed keys by using normal mechanical keyboards, which does not exist in the use of keyboard in our project. Therefore, the keyboard devised by applying sound trilateration principle to locate positions of key is more portable, energy-saving and secure than a normal keyboard, which can strengthen market competitiveness of this keyboard. This report is intended to draw attention to keyboard designers, suppliers and developers of HID as well as people who are interested in HID.
Theory
Trilateration Theory
Trilateration is a method to be used to locate the absolute or relative positions of points by measuring the distances and using the geometry of circles, spheres or triangles [2]. Compared with triangulation, it does not measure angles, but distances. More specifically, trilateration applies the known positions of two or more reference points to gauge the distance between a subject and each reference point [2]. These reference points are anchored and known locations. As to a two-dimensional (2D) plane shown in figure 2, at least three reference points are required to determine the position of a subject accurately and uniquely, which are (Xi, Yi), (Xj, Yj) and (Xk, Yk). The point of a subject is (Xu, Yu). Therefore, three distances between the subject and each reference point can be measured as Diu, Dju and Dku.
Time Difference of Arrival (TDOA)
Time difference of arrival (TDOA) is the propagation delay of a signal relative to propagation time of another signal [3]. The idea of TDOA is to measure the time differences of propagation in order to locate the position of a subject point [3]. According to the trilateration theory in section 2.1, three distances (Diu, Dju and Dku) can be obtained. Correspondingly, three times (Tiu, Tju and Tku) can be calculated by Diu/ V, Dju/ V and Dku / V respectively, where V is the speed of transmission from the subject point to the reference point. As a result, there are two effective TDOA values (Δt1 and Δt2) obtained by Eq.1 and Eq. 2.
                                    Δt1 = Tju – Tiu = Dju / V – Diu / V       	                             (1)
                                    Δt2 = Tku – Tiu = Dku / V – Diu / V	                                     (2)
For our project case as the figure 3 shown, the minimum number of microphones is three according to the sound trilateration principle in two-dimensional geometry, and the reference points are the location of microphones; the subject point is the sound source. The t1 is the propagation time spent from sound source to Microphone 1; t2 is the propagation time spent from sound source to Microphone 2. Therefore, a TDOA can be acquired as Δt1 (Δt1 = t2- t1). Likewise, another TDOA can be calculated by subtracting times from sound source to Microphone 1 and Microphone 3 (Δt2 = t3- t1). It is not difficult to find that there are many points with the same TDOA (Δt1) on a curve as shown in figure 3, which is same as a hyperbola [3]. Another curve can be drawn by another TDOA (Δt2), which is also a hyperbola. The intersection of the two different hyperbolas provides a unique position of subject point (sound source) [3]. Consequently, two different TDOA can position an exclusive location in 2D case.
Proposed Approaches
According to the theory explained in section 2, obtaining two TDOA as a coordinate such as (Δt1, Δt2) is a core idea to locate a sound source. There are two feasible methods to achieve TDOA data as presented below.
Capturing entire sound signals
The first method is to capture the entire sound signals for three microphones by using analog input of PIC, and transfer the data to Matlab software, which can plot figure and detect the peak of the initial pressure pulse for each sound signal in time domain. Afterwards find the time corresponding to the peak for each one. As a result, the TDOA can be calculated by subtracting the two times, namely, t2-t1, as shown in figure 4. This method is able to track and inspect the data of sound signals received by PIC. However, using this idea has a couple of weaknesses, which cannot achieve a desired deliverable. Firstly, the speed of the keystrokes has been limited, because it is time-consuming to capture and transfer the entire sound signals for three channels, and the time of that is much longer than the time of one keystroke. Secondly, this idea is not able to achieve real-time monitoring of keystrokes, because analog reading and transferring data to Matlab are asynchronous communication. In addition, transferring data to Matlab can extend the time of analog reading indirectly. As a result, transferring data to Matlab must be at the end of analog reading of entire sound signals for three channels.
Timer
The second method is to achieve two TDOA by using a timer, which is in the PIC and used to record propagation time spent from sound source to microphones. The following is specific operations: • First sound signal arrival ---- to record timer t1 • Second sound signal arrival ---- to record the time t2 • Third sound signal arrival ---- to record the time t3 • To calculate two TDOA ---- Δt1 = t2 - t1; Δt2 = t3 – t2 Using this idea has several advantages. Firstly, there is no need to capture all data of sound signals, because it only detects the beginning of each sound signal. Secondly, using this method can reduce the factors that can influence on system and results, such as reflections or other disturbances, because the operating time is an instantaneous. In addition, this idea allows system to achieve real-time monitoring of keystrokes, which is what our project is eager to achieve. A problem requires to be considered for this method, which is how to verify the reliability of the method. For example, how to ensure that PIC do detect each sound signal effectively especially when the experimental results are not correct in the process of project. Therefore, this issue needs take into account in the process of software design.
Final scheme
Based on the analysis in section 3.1 and 3.2, our project group is inclined to apply the second method which is using a timer in PIC to record time, thereby obtaining TDOA. Meanwhile, Matlab can be used to plot the three sound signals that PIC receives on a graph to prove and check the validity of the data.
Hardware System
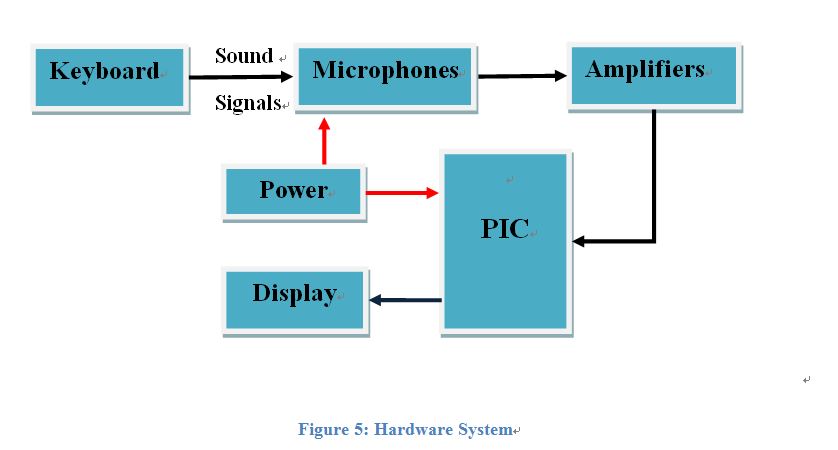
The hardware system consists of four main parts, namely, a keyboard, three microphones, three amplifiers and a PIC as figure 5 shown. Taping key engraved on keyboard will make a sound, which is picked by three fixed and identical microphones. Afterwards, the outputs of three microphones go though amplifiers respectively to amplify sound signals. Finally, PIC will receive signals and process data, and the results are shown on the screen by using serial monitor.
Keyboard
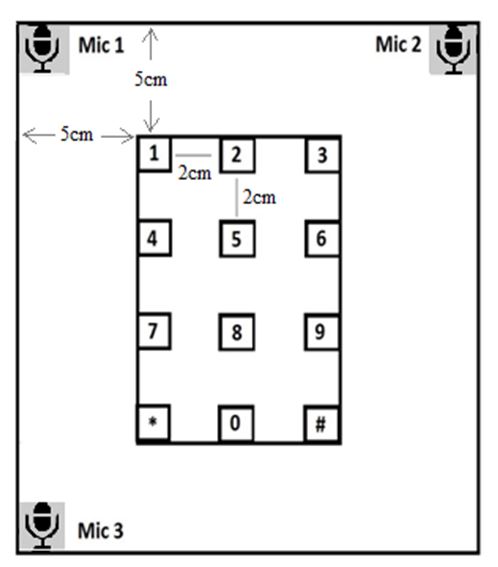
A flat plate is used as a keyboard engraved 12 “buttons” as shown in figure 6, which can be made by plastic or wood and both of them can be tapped to make a loud sound. The size of button is 1cm x 1cm, because if the button is too large, it will not save space and will trigger a big range of TDOA for each key, which may lead to trouble to distinguish the adjacent button. If the button is too small, it will be hard for users to tap button even though it reduces the difficulty for locating. Considering the points mentioned above, the 1cm x 1cm key can be an appropriate choice. The spacing between buttons is 2cm, which decides that the time of sampling to each sound signal must be less than 57.74 microseconds (us) according to the calculation in section 4.2.1. That will be a challenge for PIC. The three microphones will be placed and mounted at the edges as shown below, whose specification and design is described in the next section.
Microphones
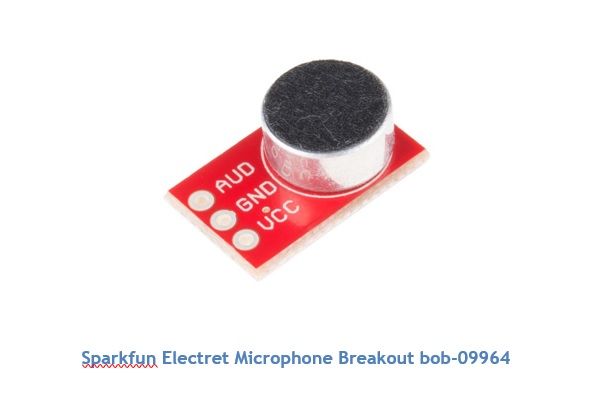
The Sparkfun Electret Microphone Breakout bob-09964 will be used in this project which consists of an omni-directional electret microphone and an amplifier. The operating voltage of it is from 2.7 V to 5.5 V. As mentioned earlier, a quantity of 3 microphones will be used.
Microcontroller
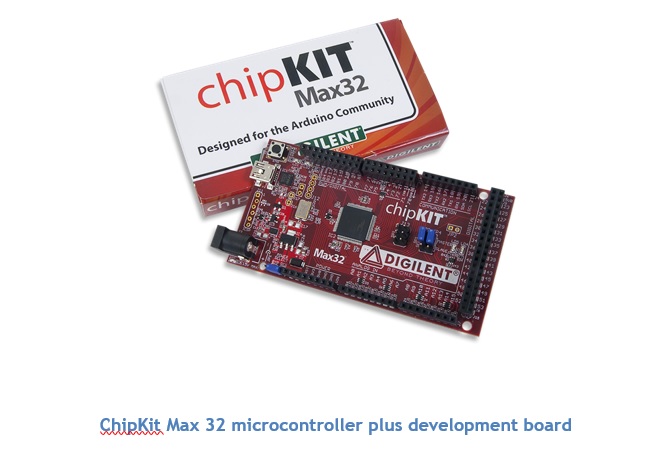
ChipKit Max32 will be used in this project which consists of a microcontroller PIC32MX795F512L and a development board. ChipKit Max32 is a prototyping platform that adds the performance of the Microchip PIC32 microcontroller. The Max32 board takes advantage of the powerful PIC32MX795F512L microcontroller, which features a 32-bit MIPS processor core running at 80 MHz and ADC speed of 1Mbps. This Chipkit can be programmed using Multi-Platform IDE (MPIDE)
Theoretical Measurements
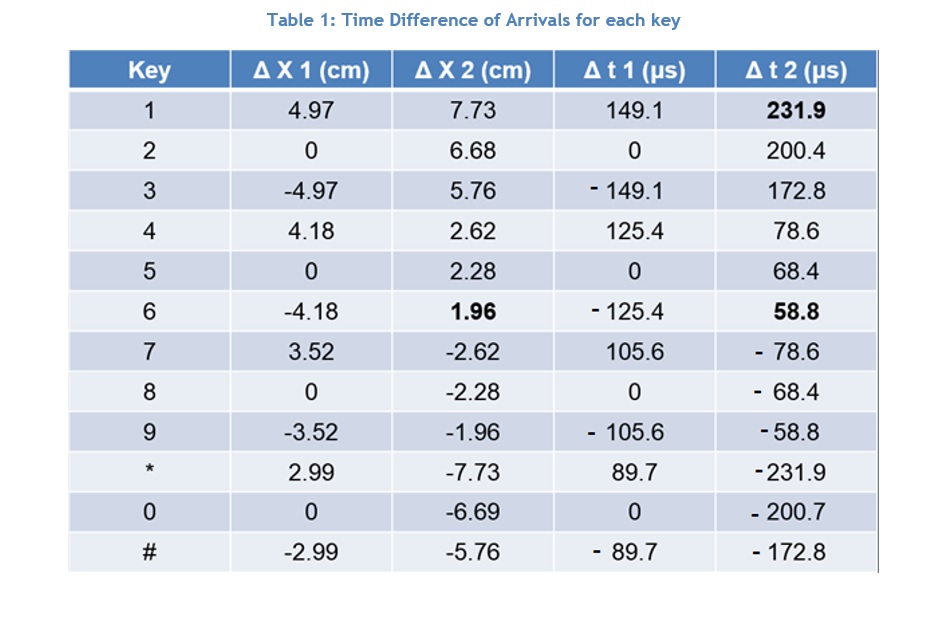
In order to get correct results, it is important to choose a correct sampling frequency. Based on the prototype design, a table of distance differences has been constructed as shown in Table 1. This table is called Time Difference of Arrivals (TDOA) because for each key, the two time differences have been calculated by using the relation between distance and time as the speed of sound in air is around 1 cm/30 µs. Δ x1 is the distance difference between mic 2 and mic 1 compared to key position, whereas Δ x2 is the distance difference between mic 3 and mic 1 compared to the same key. That corresponds to Δ t1 the time difference between mic 2 and mic 1 in detecting a generated sound, and Δ t2 is the time difference between mic 3 and mic 1 in detecting the same generated sound. So from that table we can notice that the shortest distance is around 1.96 cm. In time, it means approximately 58.8 µs which is around 17 kHz. Based on that, we must have our sampling frequency to be at least twice that, but we chose it to be 48 kHz to be in the safe side.
Experiment Results and Analysis
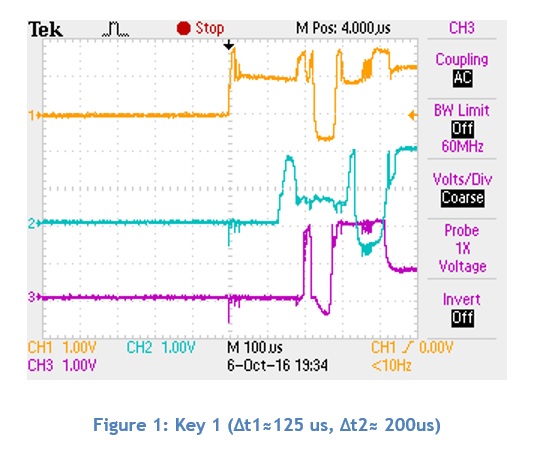
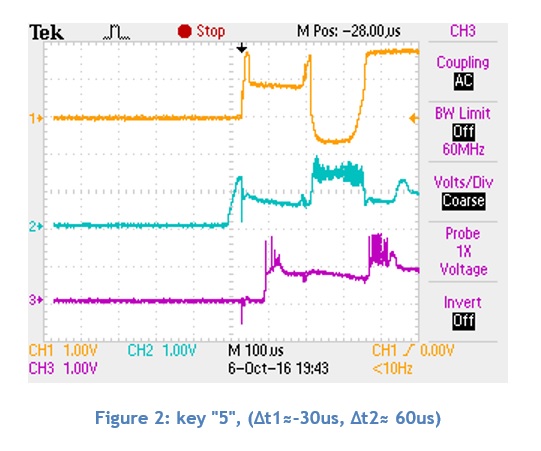
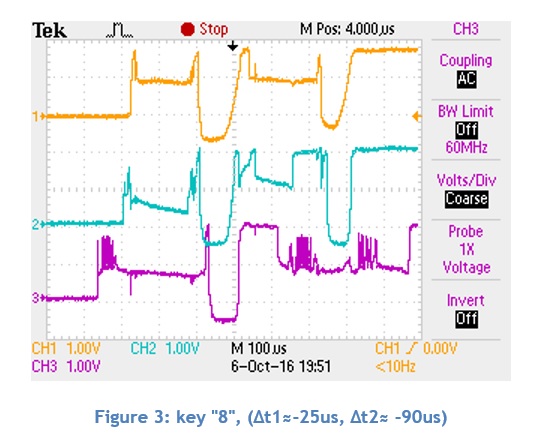
Following are samples of the experiment results that show the audio signals of the three microphones captured by the oscilloscope showing Δt1 and Δt2, where Δt1 is the time difference between microphones 2 and 1, and Δt2 is the time difference between microphones 3 and 1.
As it can be seen from the results they are very close to our theoretical calculations shown in Table 1.
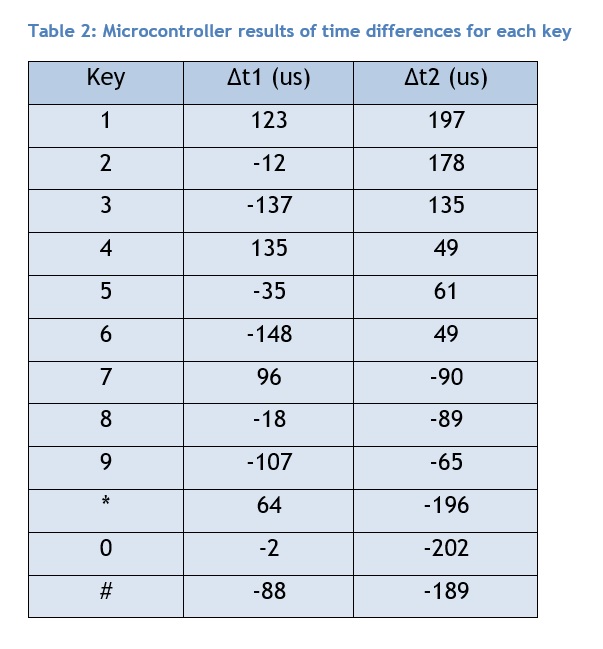
Then we have recorded the results from the microcontroller at the same time when captured the oscilloscope results. They are shown in Table 2 below.
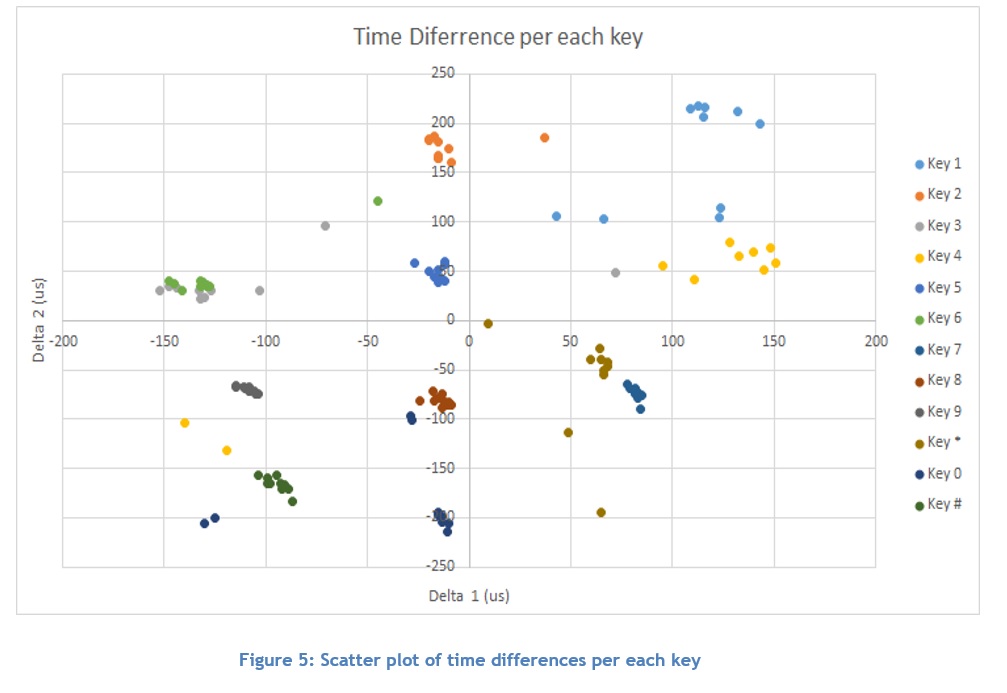
Which are also reasonable results and close to the theoretical calculations. The problem here is that we get a different result on microcontroller per each strike try. To solve this problem, we have made a scatter plot showing 10 results per each key, as shown below. Then from that plot we could specify a range of Δt1 and Δt2 per each key.
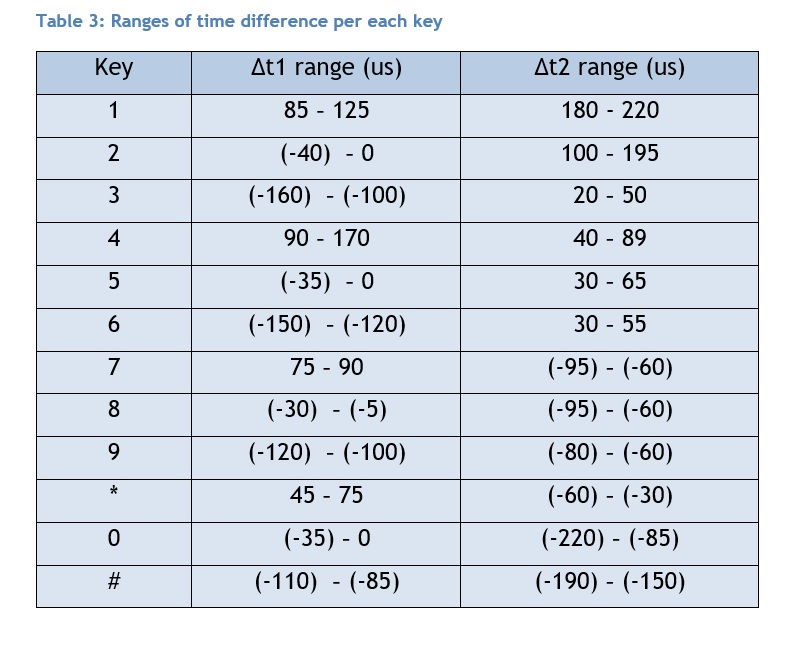
Based on that scatter plot, we constructed the ranges of time differences per each key as shown in Table 3. We used these ranges in programming the microcontroller in order to get correct results, which was the case in most tries. The constructed ranges are separated from each other in the most cases as it can be noticed from the scatter plot. The only two different cases, which have overlapping between two keys, are those between keys 3 and 6, and between 8 and 0.
Discussion
After setting up the time difference ranges per each key, we tested the keyboard by tapping each key several times to notice the response. As expected for keys 1, 4 and 5, we got a high percentage of accuracy, 8 correct results out of 8 tries. For key 2 we got 7 correct results out of 8 tries. Key 3 was a special case as its ranges overlap with those of key 6, so we get more than half correct results but sometimes we get a result of key 6 because of the overlapping and vice versa for key 6. Regarding Key 7, more than the half of the results were correct but on the other hand, we got some odd results that showed key 1 or key 8 instead. The overlapping case is repeating again for the case of keys 0 and 8 but less than that with keys 3 and 6, because the overlapping range between keys 0 and 8 is much less. Finally, keys 9, * and #, got more than 60% correct results while the rest didn't show any result which means the recorded time differences were out of ranges of any key. It has to be mentioned that, we have used a wooden pointer as a material to strike on the keyboard and all our measurements and results were based on that. It has been noticed also that the strength of the strike will affect the results and may give wrong results for example if the strike was too strong or too low. This should be as a future work to make the keyboard work on all cases including using fingers for example instead of the pointer. In addition, future work is required to solve the problem of the strike strength.
Conclusion
This project aims to design and implement a virtual keyboard based on the principle of trilateration. Three microphones will be positioned around a working space for detecting particular sound patterns. Based on the sound trilateration principle, the location of a strike can be precisely determined from different delay times of the sound it generates. This position can be translated into an associated key on a conventional keyboard. For each key in the keyboard there are two time differences which help to locate the sound source. After doing several experiments, we could specify ranges of time differences per each key which helped to predict the value of the key. Limitation about that is when the time difference ranges overlapping between some keys like 3 and 6, and between 0 and 8.
Future Work
Future work is to extend the number of buttons on the keyboard and to use more microphones for picking up the strike which will result to more precise positioning. Also, to make the keyboard respond and work on finger strike.
Topic
Sound Trilateration for Invisible Keyboards
Team members
Salim Al Arafati, Mingyue Xie
Supervisors
Dr Withawat Withayachumnankul, Dr. Brian Ng
